To replace a refrigerator door gasket, first remove the old seal and clean the mounting area. Next, secure the new gasket in place by pressing it firmly into the retainer or using the manufacturer’s clips.
Maintaining an efficient and well-functioning refrigerator is crucial for any household, and one key component to watch is the door gasket. This rubber seal ensures that cold air stays inside the appliance, preventing energy waste and keeping food fresh. Over time, the gasket may wear out or become damaged, leading to air leaks and inefficiency.
Replacing it is a straightforward DIY task that can save money on energy bills and extend the life of your refrigerator. A fresh seal not only contributes to better cooling performance but also minimizes the risk of spoilage and food waste. Keep your refrigerator running optimally by regularly inspecting the door seal and addressing any issues promptly.
Introduction To Refrigerator Door Gasket
A refrigerator door gasket is a seal. It keeps the cold in. This seal is vital for your fridge’s efficiency. Over time, it can wear out. When this happens, your fridge works harder. This means higher energy bills. It’s important to know when to replace it.
Importance Of A Proper Seal
- Keeps food fresh: A good seal stops air leaks. Your food stays fresh longer.
- Saves energy: With a tight seal, your fridge uses less power.
- Prevents frost: A leaky gasket can cause frost buildup.
Symptoms Of A Faulty Gasket
Know when to replace your gasket. Look for these signs:
- Condensation: Water on the fridge’s edge means a bad seal.
- Difficulty closing: A door that won’t shut right may have a damaged gasket.
- Visible wear: Cracks or stiffness in the gasket mean it’s time to replace.
Tools And Materials Needed
Replacing a refrigerator door gasket ensures a tight seal and efficient cooling. Gather the right tools and materials before starting. This guide lists essentials for a smooth replacement process.
Gasket Selection
Choose the correct gasket for your fridge model. Check the manual or manufacturer’s website for specifications. A precise match is crucial for proper fit and function.
- Match model number to ensure compatibility.
- Measure dimensions if manual is unavailable.
- Consider material type for durability and efficiency.
Essential Tools For The Job
Basic tools make gasket replacement easy. Ensure you have these before starting:
| Tool | Use |
|---|---|
| Nut driver or screwdriver | Remove and secure screws |
| Soap and water | Clean gasket area |
| Cloth or sponge | Dry after cleaning |
| Sealant (optional) | Ensure airtight seal |
Prepare the workspace by clearing the area. Keep the new gasket at room temperature for flexibility.
- Clear the fridge area for easy access.
- Warm gasket for pliability.
Preparing The Refrigerator
Starting the process of replacing a refrigerator door gasket sets the stage for a smoother operation. Proper preparation ensures safety and efficiency. Follow these steps to get your refrigerator ready for a new door gasket.
Safety First: Unplugging The Unit
Before anything else, safety takes priority. Pull the plug from the wall outlet. This action prevents any electrical hazards. It also ensures the appliance is safe to touch and work on. Give the refrigerator a few minutes to adjust to being powered off.
Clearing The Work Area
Next, clear space around the refrigerator. Move any obstructing items away. This creates room to work comfortably. Remove food items from the door shelves. Take out bins and trays from inside the door. Keep them aside safely. This reduces door weight, making it easier to handle during gasket replacement.
- Ensure ample lighting
- Keep tools within reach
With these preparations, you are ready to proceed. The next steps involve removing the old gasket and installing the new one.
Removing The Old Gasket
Is your refrigerator door gasket looking worn or not sealing properly? Time to replace it. The first step is removing the old gasket. This process is straightforward with the right guidance. Let’s dive into the specifics of how to locate and remove the gasket.
Locating The Fasteners
Begin by identifying the gasket fasteners. These elements hold the seal in place. Most refrigerators use screws or clips for this purpose.
- Inspect the gasket edge for screws or retainer clips.
- Use a flashlight to help spot hidden fasteners.
- Take note of the fastener type for the reinstallation phase.
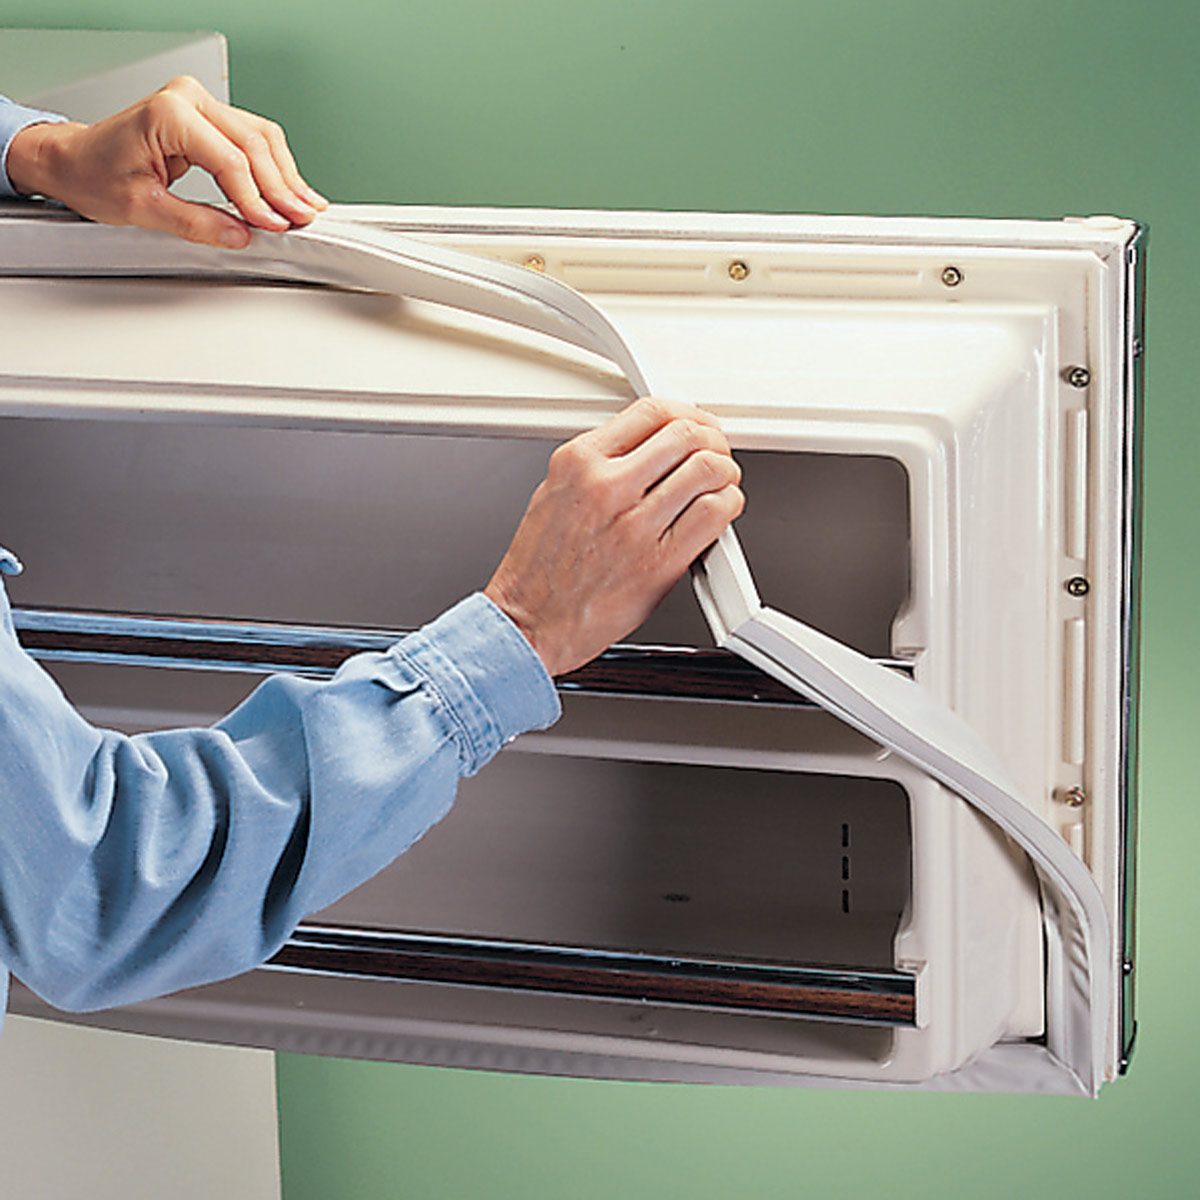
Techniques For Gasket Removal
Once the fasteners are located, removing the gasket is next. Use care to avoid damage to the refrigerator door.
- Loosen the screws or clips gently with the appropriate tool.
- Peel the gasket away from the door edge starting from a corner.
- Proceed slowly to ensure no parts of the refrigerator door are harmed.
- Discard the old gasket responsibly once fully removed.
Preparing The Door For New Gasket
Refreshing your refrigerator with a new door gasket improves efficiency and seals freshness. Start by preparing the door properly to ensure a perfect fit and function for your new gasket. Follow these steps to set the stage for a seamless gasket replacement.
Cleaning The Gasket Groove
A clean groove is crucial for the new gasket’s fit. Remove crumbs and residue to prevent issues with sealing. Use these steps:
- Switch off the refrigerator to ensure safety.
- Extract the old gasket and discard it.
- Dampen a cloth with warm, soapy water.
- Wipe down the groove thoroughly.
- Dry the area with a clean towel.
Checking For Door Alignment
Proper door alignment ensures a tight seal. Misalignment can cause gaps, leading to air leaks. Check alignment with these tips:
- Close the door and observe the gaps.
- Use a level to check the door’s straightness.
- Adjust the refrigerator’s feet, if necessary.
Once clean and aligned, your refrigerator is ready for a new gasket. Follow manufacturer instructions for installation to rejuvenate your appliance.

Credit: www.youtube.com
Installing The New Gasket
Now, let’s focus on Installing the New Gasket. This part is crucial for a tight seal on your fridge door. Follow these steps to ensure a perfect fit and secure placement.
Fitting The Gasket Properly
First, make sure the new gasket matches your refrigerator model. A correct match prevents air leaks. Lay the gasket flat for a few hours if it’s twisted or bent. This step helps it regain its proper shape. Warm it slightly with a hair dryer to make it more flexible. But, be careful not to overheat it.
- Check the gasket fits your fridge model.
- Lay it flat to remove any twists.
- Use a hair dryer for more flexibility.
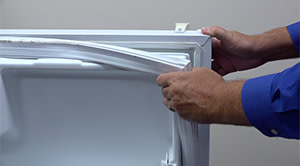
Securing The Gasket In Place
Start from a top corner and work your way around. Press firmly to secure the gasket into the groove. Make sure it’s snug and even all around the door. Use a nut driver or screwdriver to tighten the screws or retainer clips. Do not over-tighten, as this might warp the gasket.
- Begin at a top corner.
- Press firmly into the groove.
- Tighten screws or clips lightly.
Check the seal by closing the door. The gasket should hold a dollar bill tightly. If the bill slides out easily, adjust the gasket or screws.
| Step | Action | Tip |
|---|---|---|
| 1 | Fit gasket around the door | Start from the top corner |
| 2 | Secure in groove | Press firmly |
| 3 | Tighten screws/clips | Do not over-tighten |
Finally, clean the gasket and the door surface. This step ensures a good seal and extends the gasket’s life. Use mild soap and water for cleaning. Dry thoroughly.
- Clean gasket and door.
- Use mild soap and water.
- Dry thoroughly.
Testing The Seal
After replacing your refrigerator door gasket, it’s crucial to ensure a proper seal. This step keeps your fridge running efficiently and saves energy. Let’s explore how to test the seal effectively.
The Dollar Bill Test
One simple method to check the seal is the dollar bill test. Here’s how to do it:
- Open the fridge door.
- Place a dollar bill so half is inside and half is outside the fridge.
- Close the door.
- Try to pull the bill out.
If the bill slides out easily, your seal might be weak. A good seal will hold the bill firmly.
Visual Inspection Tips
Besides the dollar bill test, a visual check can reveal seal issues. Look for these signs:
- Cracks or tears in the gasket.
- Gaps between the gasket and the fridge frame.
- Signs of mold or mildew.
Press the gasket lightly with your fingers. It should bounce back. If it doesn’t, consider replacing it.
Credit: www.searspartsdirect.com
Maintenance Tips For Door Gasket
The refrigerator door gasket is a vital component. It seals in the cold air. A well-maintained gasket ensures efficiency. It prevents energy loss. Learn the best maintenance tips below.
Regular Cleaning
Clean your gasket every month. Use a mild soap and warm water. A soft cloth or sponge works best. Avoid abrasive cleaners. They can damage the gasket.
- Dip the cloth in soapy water.
- Wipe the gasket gently.
- Dry with a clean towel.
Avoiding Common Damages
Door gaskets can tear or warp. Handle them with care. Keep sharp objects away. Do not overload the door shelves. This can strain the gasket.
Check for wear regularly. Replace when needed. Always use the right gasket for your model.
Troubleshooting Common Issues
Refrigerator door gaskets seal in the cold air. Over time, they can wear out or get damaged. This can lead to temperature issues and inefficiency. Knowing how to troubleshoot common gasket problems is key. It saves energy and keeps food fresh.
Dealing With Gaps And Leaks
Gaps and leaks can cause a fridge to work harder. Check the gasket for dirt and debris. Clean it with a mild soap and warm water. Dry it thoroughly. Inspect the gasket for cracks or tears. Minor issues can be fixed with gasket sealant. For bigger gaps, adjust the door hinges for a tighter fit. Use a dollar bill to test the seal. Close the door on the bill. If it pulls out easily, you have a gap.
When To Call A Professional
Sometimes, a DIY fix isn’t enough. Call a professional when:
- The gasket is too worn or damaged.
- You can’t find the right replacement.
- DIY fixes haven’t solved the problem.
- The door won’t align properly.
A skilled technician can ensure a proper fix. They can also handle complex issues. This guarantees your fridge runs efficiently.
Credit: www.familyhandyman.com
Frequently Asked Questions
Can You Replace A Refrigerator Gasket Yourself?
Yes, you can replace a refrigerator gasket on your own. Carefully remove the old gasket, clean the mounting area, and secure the new gasket in place.
How Much Does It Cost To Replace Refrigerator Door Gasket?
The cost to replace a refrigerator door gasket typically ranges from $60 to $100, including parts and labor.
What Happens If A Door Gasket On A Refrigerator Is Leaking?
A leaking refrigerator door gasket can lead to excess energy use and food spoilage by allowing cold air to escape.
How Can You Tell If A Door Gasket Is Bad On A Refrigerator?
To determine if a refrigerator door gasket is faulty, check for tears, looseness, or condensation signals, which indicate a poor seal and potential gasket failure.
Conclusion
Replacing your refrigerator door gasket is a simple yet effective way to improve efficiency and save on energy costs. With the right tools and a bit of patience, you can achieve a seal that’s as good as new. Remember, a snug gasket means a happy fridge, keeping your food fresher, longer.
Don’t hesitate to tackle this DIY project and reap the rewards of your handiwork.